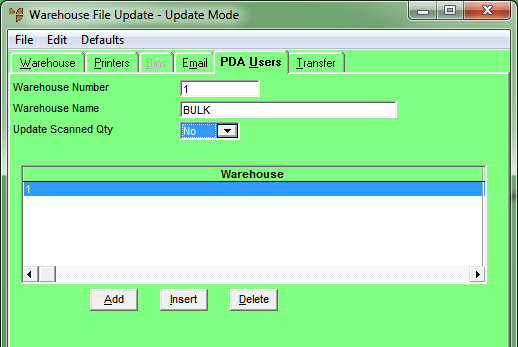
Use the Warehouse File Update screen - PDA Users tab to assign specific pickers in a warehouse to specific customers.
To add or edit pickers for customers:
Refer to "Adding a New Warehouse" or "Updating a Warehouse".
Micronet displays the Warehouse File Update screen - PDA Users tab showing all current picker assignments.

|
|
Field |
Value |
|---|---|---|
|
|
Update Scanned Quantity |
When loading a goods received batch from a PDA, this field allows you to select whether the quantity scanned on the PDA updates the Received quantity on a goods received line (the default) or a Scanned Quantity field. Select an option:
|
|
|
|
Technical Tip If you set this field to Yes, you can compare the differences between received and scanned quantities using the SORT menu option on the Goods Received screen – see "Goods Received - Sort". |
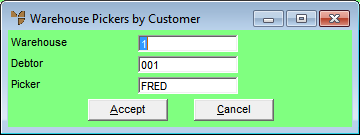
If you selected to add, insert or edit a picker assignment, Micronet displays the Warehouse Pickers by Customer screen.

|
|
Field |
Value |
|---|---|---|
|
|
Warehouse |
Micronet displays the ID of the currently selected warehouse. You can delete this warehouse ID then press Tab or Enter to select a different warehouse if required. Note that you won't be able to view the picker assignment until you open that warehouse in the Warehouse master file. |
|
|
Debtor |
Enter the ID of the debtor you want to assign a picker to. You can also press spacebar then Enter to select a debtor. |
|
|
Picker |
Enter the ID of the picker you want to assign to the selected debtor. You can also press spacebar then Enter to select a picker. |
|
|
|
Technical Tip You can change the picker assigned to a picking slip using the Warehouse Scheduler (refer to "Warehouse Scheduler - Picking Slips"). |
If you selected to add a picker assignment, Micronet redisplays the Warehouse Pickers by Customer screen so you can add further picker assignments.
Micronet redisplays the Warehouse File Update screen - PDA Users tab showing all the picker assignments for the warehouse.